
Build a Minimal Python Web App with Flask
You have already written Python that asks for data. Now you are going to write Python that answers.

Key topics
You have already written Python that asks for data. Now you are going to write Python that answers.
That is the whole shift. In an API request, your script is the client: it reaches out, waits, and reads a response. In a web app, your code is the server: it waits, receives a request, and decides what to send back. Same conversation, opposite seat.
By the end of this tutorial, you will have a small Flask app running on your own machine, a browser showing a response you wrote, and a clear mental model of what "the server" is actually doing.
What Changes When Python Serves the Request
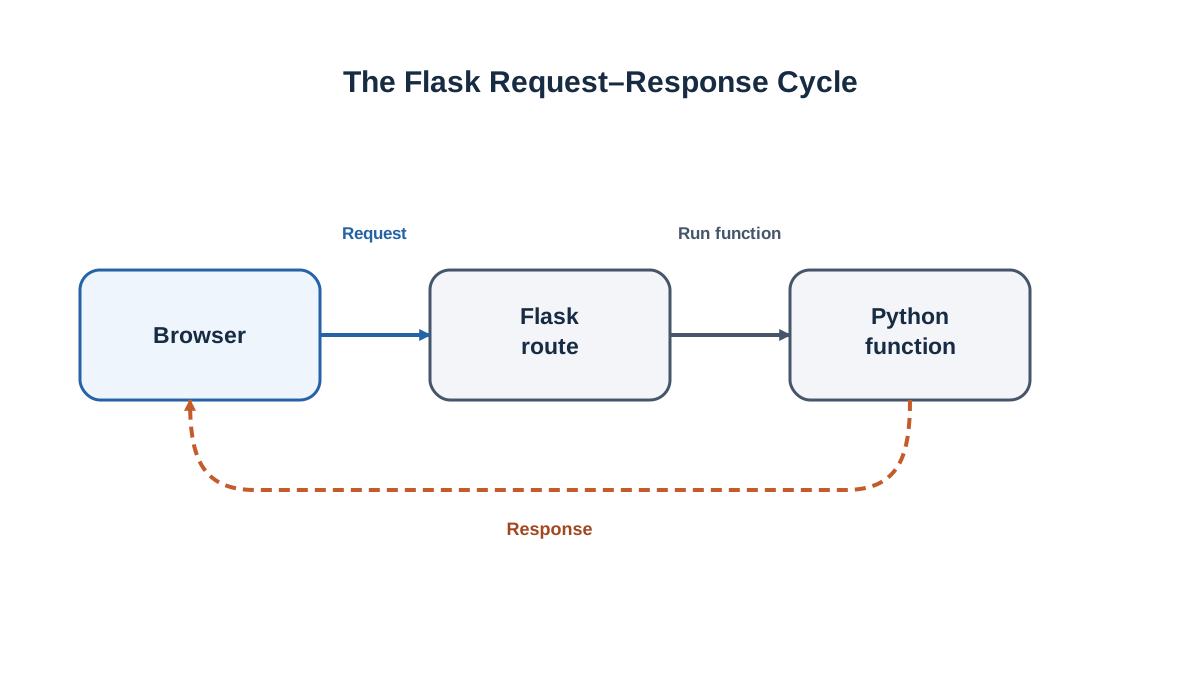
When you call an API from a script, the flow is one-directional from your point of view. Your code sends a request, the remote server processes it, and your code receives a response. You initiate. You wait. You parse.
A web application flips that. Your code sits still until a browser (or another program) sends a request. Then your code runs, produces a response, and goes back to waiting. You are no longer the one asking. You are the one being asked.
Handling that reversal by hand would mean writing code to listen on a network port, parse raw HTTP text, match the requested path to the right function, and format a valid response. That is a lot of plumbing before you get to anything interesting.
A web framework handles that plumbing for you. It listens on the port, parses the incoming request, matches the URL to a function you wrote, and sends back whatever that function returns. You write the decision. The framework handles the delivery.
Flask is a microframework, which means it does the minimum: routing, request handling, and response formatting. It does not force a database, an admin panel, or a project structure on you. For a first web app, that small surface area is exactly what you want. You can see the whole mechanism instead of guessing which layer did what.
The cycle in plain terms:
- A browser asks for a specific path, like
/. - Flask matches that path to a function you wrote.
- Your function runs and returns something.
- Flask wraps that return value in an HTTP response and sends it back.
- The browser renders it.
That is the request-response cycle. Everything else in this tutorial is a detail of that loop.
This article assumes you can already run a .py file and have seen a JSON response come back from an API call. We are reusing that vocabulary, just from the other side of the conversation.
Knowledge check
Check your understanding
Answer this question before you continue.
Set Up a Safe Place to Install Flask
Before you install anything, create a folder for this project and a virtual environment inside it.
A virtual environment is a private box of packages for one project. Without it, pip install flask drops Flask into your system-wide Python, where it mixes with every other project's dependencies. That works until two projects need different versions of the same package, and then you get errors that look like Python is broken when the real problem is a shared shelf.
Here is the setup. Create the folder and move into it:
mkdir flask-hello
cd flask-hello
Now create the virtual environment:
python -m venv venv
That creates a venv folder containing an isolated Python. Activate it.
On macOS or Linux:
source venv/bin/activate
On Windows:
venv\Scripts\activate
After activation, your terminal prompt changes to show (venv) at the start. That prefix is your proof that the environment is active. If you do not see it, activation did not work, and anything you install now goes to the wrong place.
With the environment active, install Flask:
pip install flask
Confirm it landed where you expect:
python -c "import flask; print(flask.__version__)"
3.1.0
Your version number may differ. What matters is that the command prints a version instead of raising ModuleNotFoundError. That error means Flask is not visible to this Python, which almost always means the environment is not active or you installed into a different interpreter.
Common mistake: Installing Flask in one terminal, then opening a new terminal and running your app there. The new terminal has no active environment, so the import fails. Activate the environment in every new terminal session before running the app.
Knowledge check
Check your understanding
Answer this question before you continue.
Your First Minimal Flask App
Create a file called app.py in your project folder:
from flask import Flask

app = Flask(__name__)

@app.route("/")
def home():
    return "Hello from Flask"

if __name__ == "__main__":
    app.run()
Four things are happening here, and each one matters.
from flask import Flask brings the framework into your file.
app = Flask(__name__) creates the application object. This object is the thing that receives requests and dispatches them. The __name__ argument tells Flask where the app lives so it can find related files later.
@app.route("/") is a decorator. It attaches a URL path to the function directly below it. This line says: when a request arrives for the path /, run the next function. The decorator is the bridge between a URL and your code.
def home(): return "Hello from Flask" is the function that runs. Whatever it returns becomes the response body the browser receives. A plain string becomes plain text.
The if __name__ == "__main__": block runs the development server only when you execute this file directly.
Run it:
python app.py
 * Serving Flask app 'app'
 * Debug mode: off
 * Running on http://127.0.0.1:5000
Press CTRL+C to quit
That address is what you need next. 127.0.0.1 is localhost, meaning this machine and no other. 5000 is the port Flask chose by default. Together they say: the server is listening on your computer, on port 5000.
Note: This is Flask's built-in development server. It is meant for testing on your own machine. It is not built to handle real internet traffic, and you should not use it to host anything public.
Knowledge check
Check your understanding
Answer this question before you continue.
Verify the Response in Your Browser
Open http://127.0.0.1:5000 in a browser. You should see:
Hello from Flask
That text came from your function. The browser asked, Flask matched the path, your function returned a string, and Flask sent it back. The loop closed.
Now look at your terminal. You will see a line like this:
127.0.0.1 - - [date] "GET / HTTP/1.1" 200 -
Every time you refresh the browser, another line appears. That is direct evidence that your function ran again. The request is not cached somewhere; it is hitting your code each time.
Try the smallest possible edit. Change the returned string:
@app.route("/")
def home():
    return "Hello again"
Save the file and refresh the browser. If you see the old text, the server is still running the old code. Stop it with CTRL+C and start it again with python app.py. The change appears.
Now add a second route:
@app.route("/about")
def about():
    return "This is the about page"
Restart, then visit http://127.0.0.1:5000/about. A different path reached a different function. That is routing.
Finally, visit a path you never defined, like http://127.0.0.1:5000/missing. You get a 404 page. That number means the request arrived but no route matched the path. Your app is fine. The path simply has no function attached to it.
Knowledge check
Check your understanding
Answer this question before you continue.
Serving a Request vs Consuming an API
This is the distinction worth locking in, because it changes how you read every error from here on.
| Consuming an API | Serving a request | |
|---|---|---|
| Who starts it | Your script | The browser or client |
| Who waits | Your script | Your app |
| What your code receives | A response object | A request |
| What your code returns | Nothing (it reads) | A response body and status |
| Where errors surface | In your script's try/except | In the browser and terminal log |
| Typical use | Fetching data, calling a service | Answering a form, serving a page, exposing data |
When you consume, you handle failure: timeouts, bad status codes, malformed JSON. When you serve, you decide the outcome: what status to send, what body to return, what to do when the input is wrong.
The practical payoff is that you can now build the other half of the conversation. A small internal tool, a form endpoint, a local dashboard that shows your own data — all of these are the same pattern you just ran.
When not to use Flask: If your task is a one-off script, a scheduled job, or a data cleanup pass, you do not need a web server. A web app earns its place when something else needs to ask your code for an answer over HTTP.
Common Beginner Mistakes and How to Read Them
Most first-app failures fall into a handful of patterns. Each one is evidence, not a dead end.
ModuleNotFoundError: No module named 'flask' — The environment is not active, or Flask was installed into a different Python. Check for the (venv) prefix in your prompt. If it is missing, activate the environment and try again.
Address already in use — A previous server process is still running. Find the terminal where you started it and press CTRL+C, or run the app on a different port with app.run(port=5001).
Nothing appears in the browser — Check the exact host and port printed in your terminal. 127.0.0.1:5000 and localhost:5000 usually point to the same place, but a typo in either will fail. Also check the trailing slash: /about and /about/ can behave differently depending on how the route is defined.
You edited the file but see old output — The server needs a restart unless debug mode is on. You can enable it with app.run(debug=True), which reloads the server when you save a file and shows detailed errors in the browser. It is a development convenience only; never leave it on in anything public.
The general rule: read the error, find which assumption it contradicts, fix that assumption. The error is telling you what the system actually did, not what you hoped it would do.
Practice: Extend the App One Step
Here is a small task that reinforces routing and the edit-observe loop.
Add a route at /status that returns a short multi-line message. Then add a route at /greeting that returns an HTML heading instead of plain text.
Expected behavior: visiting /status shows your message on multiple lines, and visiting /greeting shows a bold heading rather than raw tags.
The hint is that the decorator pattern is identical. Only the path and the returned string change. For the HTML version, return a string like "<h1>Hello</h1>" and the browser will render it as a heading instead of showing the tags.
If you want one more step, return a small JSON object from a route:
@app.route("/data")
def data():
    return {"status": "ok", "count": 3}
Visit /data and you will see the JSON rendered in the browser. The same mechanism that carried a plain string now carries structured data. That is the bridge back to the API work you already did — except this time you are the one producing the response.
What to memorize now: the app instance, the route decorator, and the run call. Look up templates, forms, and deployment when you actually need them.
Where This Goes Next
You now have the smallest working version of a program that answers a request. If a task needs to respond to a browser or another program, you have the pattern. If a task needs to fetch data, you already have the client-side pattern from before.
The natural next step is returning HTML from a template file instead of a hardcoded string. That is where a minimal app starts becoming a real one: the response stops being a fixed line and starts being a page built from data. When you are ready, that is the direction to take.
Knowledge check
Final check
Finish the article by checking the ideas you just learned.
References
Want a more structured Python path?
Use the Python Starter Pack to turn scattered tutorials into a focused practice path.
Python for Artificial Intelligence Starter Pack
Build a Python foundation you can actually use. The Python for AI Starter Pack brings together a guided path through setup, core programming concepts, data structures, files, JSON, APIs, debugging, and practical projects—so you can move quickly from running your first program to understanding and building useful software.
- 264-page illustrated PDF
- 12 guided Python chapters
- Visual concept diagrams
- Self-assessment quizzes
- Bonus deep-dive sections
- Files, JSON, APIs, debugging & projects
- Foundation for data, automation & AI
Coming soon


