
Nested Loops in Python: How and When to Use Them
A single loop repeats one action. A nested loop repeats an action inside another repeated action—and that small shift is what lets you walk grids, tables,…

Key topics
A single loop repeats one action. A nested loop repeats an action inside another repeated action—and that small shift is what lets you walk grids, tables, and every pair of items in a list. The inner loop runs all the way through for every single step of the outer loop. Get that rhythm right, and a whole class of problems stops looking scary.
Why Nested Loops Exist
Suppose you need to print a tic-tac-toe board, or compare every item in one list to every item in another. A single loop only gets you partway. You need to repeat work inside each step of another loop—and that is exactly what a nested loop does.
If you already know how to use for loops and while loops, nested loops are the next practical tool. They let you handle grids, tables, combinations, and any situation where you need to work with pairs or groups of things in a structured way.
What Is a Nested Loop?
A nested loop is a loop inside another loop. Think of a clock: for every tick of the hour hand (the outer loop), the minute hand (the inner loop) goes all the way around. In code, the inner loop runs through all its steps for every single step of the outer loop.
Here is the basic structure:
for outer in range(outer_count):
    for inner in range(inner_count):
        # Do something with outer and inner
You can nest while loops the same way, and you can even mix the two.
Tip: Indentation is not optional. The code inside the inner loop must be indented more than the outer loop. Python uses indentation to know which code belongs to which loop.
First Hands-On Example: Printing a Grid
Let's see a nested for loop in action. Here is how to print a 3x3 grid of stars:
for row in range(3):
    for col in range(3):
        print("*", end=" ")
    print()  # Move to the next line after each row
* * *
* * *
* * *
What's happening here?
- The outer loop (
for row in range(3)) runs 3 times—once for each row. - The inner loop (
for col in range(3)) runs 3 times for each row—once for each column. print("*", end=" ")prints a star and stays on the same line.print()after the inner loop moves to the next line, starting a new row.
How Nested Loops Actually Work
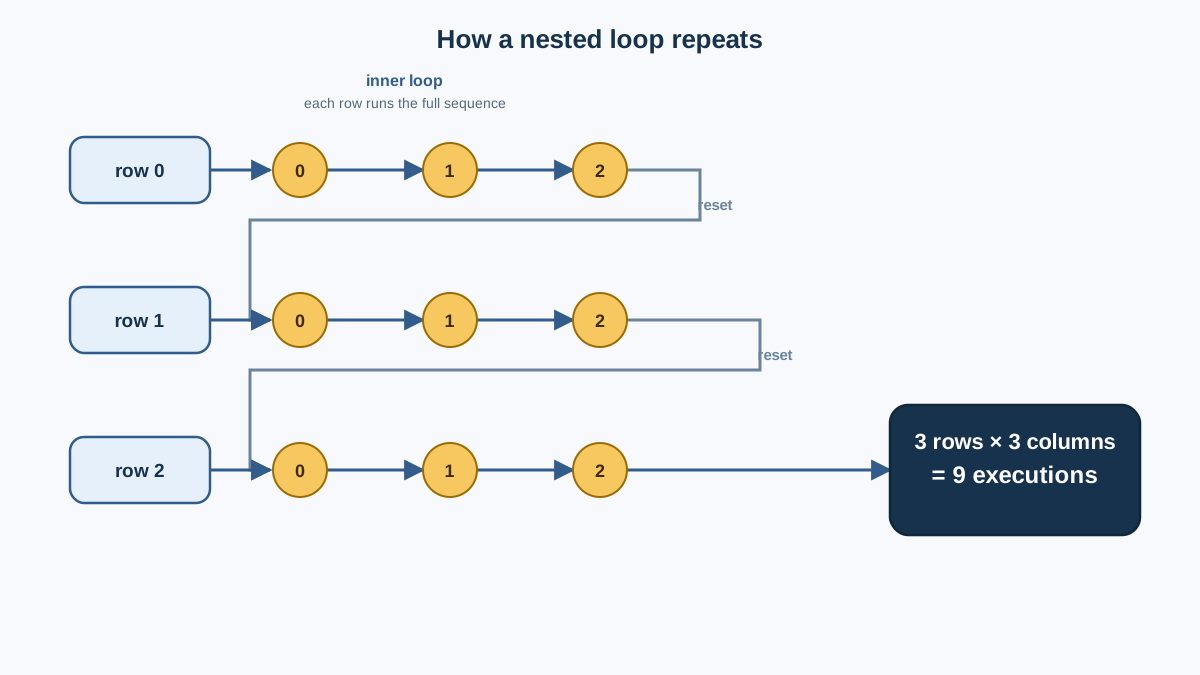
Let's trace the flow step by step:
- The outer loop starts with
row = 0. - The inner loop runs with
col = 0, 1, 2, printing three stars on one line. - After the inner loop finishes,
print()moves to the next line. - The outer loop moves to
row = 1, and the process repeats. - This continues until the outer loop is done.
Key point: the inner loop runs all the way through for every single step of the outer loop. That is the whole mechanism. If the outer loop runs 3 times and the inner loop runs 3 times, the inner body executes 3 × 3 = 9 times.
Knowledge check
Check your understanding
Answer this question before you continue.
Nested Loops on Real Data: Lists Inside a List
Star grids teach you the rhythm, but the reason nested loops matter is that real data is often structured in layers: a list of students, each with a list of grades; a list of rows, each with a list of cells. The outer loop picks one group, and the inner loop walks through everything inside that group.
Here is a small example with a list of lists:
scores = [
    ["Ada", 92, 88],
    ["Grace", 95, 91],
    ["Alan", 78, 84],
]

for student in scores:
    name = student[0]
    for score in student[1:]:
        print(f"{name}: {score}")
Ada: 92
Ada: 88
Grace: 95
Grace: 91
Alan: 78
Alan: 84
Watch what the two loops are doing:
- The outer loop selects one row at a time—first
["Ada", 92, 88], then["Grace", 95, 91], then["Alan", 78, 84]. - The inner loop walks through the scores inside that one row.
- When the inner loop finishes, the outer loop moves to the next row, and the inner loop starts over from the beginning.
That last point is the whole trick: the inner loop resets for each new outer item. It does not remember where it left off. Every time the outer loop takes a step, the inner loop runs its full pass again. That is why the inner body runs outer-count × inner-count times.
Common Beginner Mistakes with Nested Loops
Nested loops are powerful, but they are also a common source of beginner bugs. Watch out for these:
Common mistake: Indentation errors. If you forget to indent, or over-indent, your code won't behave the way you expect. Python reads the indentation, not a pair of braces, to decide which loop owns which line.
Common mistake: Mixing up which loop controls what. The outer loop usually handles rows or the first item, and the inner loop handles columns or the second item. Swapping them changes the order of your output.
Common mistake: Reusing variable names. Don't use the same variable name for both loops (like
for i in range(3): for i in range(3):). The inner assignment overwrites the outer value and your logic quietly breaks.
Tip: If your output looks wrong, check your indentation first, then check which loop is outer versus inner.
Nested For Loops vs. Nested While Loops
You can nest both for and while loops. The choice depends on your task:
| Loop Type | Use this when... | Avoid when... | Example |
|---|---|---|---|
Nested for loop | You know exactly how many times to repeat | You don't know the end condition | Printing grids, looping over 2D lists |
Nested while loop | A changing condition controls when to stop | You have a fixed range or count | Processing data until a condition is met |
Here is a nested while loop that prints the same 3x3 grid:
row = 0
while row < 3:
    col = 0
    while col < 3:
        print("*", end=" ")
        col += 1
    print()
    row += 1
* * *
* * *
* * *
Notice what this version forces you to manage by hand. The inner counter col must be initialized inside the outer loop so it resets to 0 for every new row, and it must be incremented on each pass or the inner loop never ends. If you forget either step, you get an infinite loop or a grid that collapses onto one line. A for loop hides that bookkeeping for you, which is why it is the safer default for anything with a known size.
In practice: use for loops for grids, tables, or when you know the size ahead of time. Use while loops when a changing condition genuinely controls termination—for example, processing records until the data runs out.
Note: You can nest a
whileloop inside aforloop, or vice versa. The logic is the same: the inner loop runs completely for each step of the outer loop.
Knowledge check
Check your understanding
Answer this question before you continue.
When to Use Nested Loops—and When Not To
Nested loops are the clearest tool when your task genuinely has two related layers and the inner work is easy to name. The scores example is a perfect fit: the outer layer is the student, the inner layer is that student's scores, and the inner work ("print each score") is a single, obvious action.
Reconsider nesting when any of these is true:
- The loops scan unrelated data. If the outer and inner loops have nothing to do with each other, you are probably forcing a structure that does not exist.
- The inner work is expensive and repeats. If the inner loop recomputes the same thing for every outer item, you are paying for work you could do once.
- You need several flags and hidden state to control the flow. When you find yourself juggling booleans to exit or skip, the nesting is fighting you, not helping.
A nested loop is a tool, not a badge of honor. Use it when it is the clearest way to express the problem, and reach for a built-in or a simpler structure when it isn't. If you find yourself nesting three or more levels deep, stop and ask whether the data really has that many layers or whether you are overcomplicating the task.
Knowledge check
Check your understanding
Answer this question before you continue.
Moving Beyond Printing: Accumulating Inside a Nested Loop
Printing each score is a good start, but real work usually means collecting or adding as the inner loop runs. That is where you need to manage state that resets per outer item.
Here is the same scores data, but now each student's total is built up inside the inner loop and the average is computed after it finishes:
scores = [
    ["Ada", 92, 88],
    ["Grace", 95, 91],
    ["Alan", 78, 84],
]

for student in scores:
    name = student[0]
    total = 0
    for score in student[1:]:
        total += score
    average = total / len(student[1:])
    print(f"{name}: {average:.1f}")
Ada: 90.0
Grace: 93.0
Alan: 81.0
The key detail is where total = 0 lives. It sits inside the outer loop, so it resets to zero for every new student. If you moved it above the outer loop, the totals would keep piling up across all students and every average would be wrong. The inner loop adds each score to the running total, and only after the inner loop finishes do you divide and print. That ordering—reset, accumulate, then use the result—is the pattern you will reuse on tables, CSV files, and any grouped data.
Knowledge check
Check your understanding
Answer this question before you continue.
Practice Tasks: Build Your Skills
Try these to get hands-on with nested loops:
- Task 1: Print a multiplication table (1 through 5) using nested loops.
- Task 2: Take the scores example and change the inner loop to find each student's highest score instead of computing an average. Keep a
bestvariable that resets per student, compare inside the inner loop, and print the result after it finishes.
If you need a refresher, review basic for and while loops first. When you're ready, practice controlling how a loop exits or skips steps with break and continue.
Next Step: Apply the Model to Real Data
The mental model to carry forward is simple: one full inner pass happens for every outer item, and that relationship decides both usefulness and cost. Use it when the data has two real layers and the inner work is easy to name; drop it when the loops scan unrelated data or repeat expensive work.
Before you write any nested loop, count the inner executions. If the outer loop runs m times and the inner loop runs n times, the inner body runs m × n times. That single count tells you whether nesting is the right shape for the job—or whether you are about to pay for a grid of work you never needed.
Knowledge check
Final check
Finish the article by checking the ideas you just learned.
References
Research updated Sep 5, 2026
Want a more structured Python path?
Use the Python Starter Pack to turn scattered tutorials into a focused practice path.
Python Starter Pack
A compact LearnPyFast PDF pack covering what Python is, installation, your first program, running Python code, and Python versions.
- 5 curated chapters
- Enhanced PDF edition with bundle-only learning guidance
- Offline-friendly format for focused review
- Source article links for future online updates
Coming soon


