
Version Control for Python Projects: Track Changes and Restore Earlier Work
It looks like main.py, main_v2.py, main_final.py, and main_final_REAL.py. It works right up until the moment you can't remember which copy is current, what…

Key topics
Your folder already has a version control system. It's just a bad one.
It looks like main.py, main_v2.py, main_final.py, and main_final_REAL.py. It works right up until the moment you can't remember which copy is current, what changed between them, or why you made two of them. And when the version that runs stops running, you have no clean way back.
Real version control fixes exactly that. For a Python project, it gives you three things: a record of every change, a way to read that record, and a way to return to the last state that worked. In this tutorial, you'll set that up on your own small project, make a save point, break something on purpose, and restore it.
Why Your Folder of Copies Is Not Version Control
The copy-and-rename habit fails in three predictable ways.
First, you lose the why. main_v2.py tells you a change happened, not what it was or what problem it solved. Second, you lose the when. File timestamps lie the moment you copy a file or move it between folders. Third, you lose the comparison. To see what changed between two copies, you have to open both and read them side by side, line by line, by eye.
A version control system stores a full history of your project and lets you move between saved states. That's the whole idea. You take a snapshot when the code works, and later you can look back at any snapshot or return to one.
Git is the tool most Python projects use for this, and it runs locally on your machine. You don't need an account, a server, or an internet connection to start. Those come later, when you want your history to survive a dead laptop.
This tutorial assumes you already have a small project you can run from its root folder. If your files are still scattered across your desktop, organize them into one folder first, then come back. Everything here builds on that single project root.
Set Up Git Once, Then Initialize Your Project
You only install and configure Git once per machine. After that, every project is a two-minute setup.
Check whether Git is installed
Open your terminal and run:
git --version
If Git is installed, you'll see something like:
git version 2.43.0
The exact number doesn't matter. If you instead see command not found, install Git from the official Git website or your system's package manager, then run the check again.
Set your identity once
Git labels every save point with a name and email. Set them once, globally:
git config --global user.name "Your Name"
git config --global user.email "[email protected]"
These don't need to be real-world accurate for a personal project. They just need to be consistent, because they'll appear next to every commit you make.
Initialize the project
Navigate to your project root — the folder that contains your main script — and run:
git init
You'll see a short confirmation:
Initialized empty Git repository in /path/to/your/project/.git/
That hidden .git folder is the repository. It holds your entire history. The folder around it is just your working files. This distinction matters later: deleting .git deletes your history, even though your code files stay put.
Now check the state of things:
git status
You'll see something like:
On branch main

No commits yet

Untracked files:
  (use "git add <file>..." to include in what will be committed)
        main.py

nothing added to commit but untracked files present
"Untracked" means Git can see the file but isn't watching it yet. That's expected. You haven't made your first save point.
Knowledge check
Check your understanding
Answer this question before you continue.
Add a .gitignore before your first commit
Before you commit anything, create a file named .gitignore in the project root. It tells Git which files to ignore forever.
__pycache__/
.venv/
.env
*.pyc
This keeps Python's cache folders, your virtual environment, and any secret files out of your history. Do this now, not later. Cleaning a virtual environment out of your history after the fact is annoying; preventing it takes ten seconds.
Your First Save Point: Stage and Commit
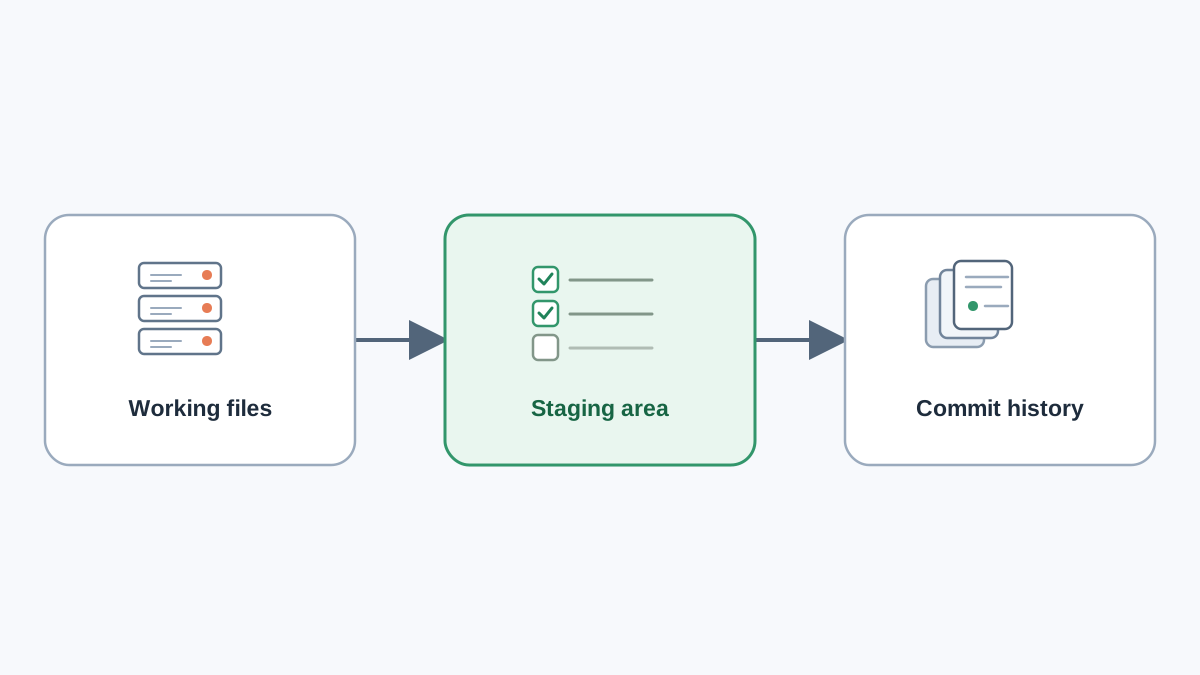
Git has a two-step save model, and beginners trip on it constantly. Learn it once and it stops being strange.
git addchooses what goes into the next save point.git commitwrites that selection into history with a message.
Staging is a selection step, not a formality. It's how you decide what the snapshot contains.
Let's make a tiny example. Create a file called greet.py:
def greet(name):
    return f"Hello, {name}!"

print(greet("world"))
Run it:
python greet.py
Expected output:
Hello, world!
It works. Now save this state. Stage both the script and the ignore rules you just created:
git add greet.py .gitignore
Check what you're about to save before you save it:
git status
Expected output:
On branch main

No commits yet

Changes to be committed:
  (use "git rm --cached <file>..." to unstage)
        new file:   .gitignore
        new file:   greet.py
Both files are staged. Now commit them with a message:
git commit -m "Add greet script and ignore rules"
You'll see a summary line:
[main (root-commit) 3f9a1c2] Add greet script and ignore rules
 2 files changed, 8 insertions(+)
That's your first save point. Notice the short ID 3f9a1c2 — Git uses IDs like this to reference specific commits later.
Write messages for future-you
A commit message is documentation you write for the person who will read it in a panic at 11 p.m. That person is you.
"Add greet script and ignore rules" is fine. "stuff" and "fix" are not, because they tell future-you nothing. A good beginner rule: describe what changed and why, in one short line. "Fix off-by-one in total calculation" beats "fix bug" every time.
Knowledge check
Check your understanding
Answer this question before you continue.
Read Your History Before You Need It
Most beginners only learn to read history when something is already broken. That's the worst time to learn. Make it a habit now, while nothing is on fire.
Three commands cover almost everything.
git status answers "what changed since my last save point?" You'll run this more than any other command.
git diff shows the actual line-by-line change before you commit it. This is how you catch a stray edit you forgot about.
git log --oneline gives you a compact list of save points:
git log --oneline
Expected output:
3f9a1c2 (HEAD -> main) Add greet script and ignore rules
Newest commit first, each with a short ID and your message. As your project grows, this list becomes a readable timeline of your work.
Here's the judgment call I'd make if I were you: read the diff before you commit, not after. It's cheaper to catch a mistake at the staging step than to untangle it from history. Run git diff after editing a file and before git add. You'll see exactly what you're about to save.
Knowledge check
Check your understanding
Answer this question before you continue.
Restore an Earlier Working State
This is the payoff. You edited a working script, it now raises an error or prints the wrong thing, and you want the last good version back.
There are three paths, and which one you reach for depends on whether the bad change is already committed.
Path 1: Discard uncommitted changes
If you broke the file but haven't committed yet, this is the safest and simplest move:
git restore greet.py
This throws away your uncommitted edits and returns the file to its last committed state. Run git status afterward and you'll see a clean tree:
On branch main
nothing to commit, working tree clean
Use this when you know the change was wrong and you don't want to keep it. Be aware: git restore discards work permanently. If there's any chance you want the edit, commit it first, then revert.
Path 2: Pull a file from an older commit
If the last commit is also wrong, you need a specific file from an earlier save point. Get the commit ID from git log --oneline, then:
git checkout 3f9a1c2 -- greet.py
This copies greet.py from that commit into your working files. You can then review it and commit the restored version.
Path 3: Undo a commit that's already in history
This path only makes sense once you have a bad commit to undo. So let's create one. Edit greet.py so it prints the wrong thing:
def greet(name):
    return f"Goodbye, {name}!"

print(greet("world"))
Run it:
python greet.py
Expected output:
Goodbye, world!
That's wrong. Commit the mistake anyway, so you have something to undo:
git add greet.py
git commit -m "Change greeting to Goodbye"
Now git log --oneline shows two save points:
b7e4d91 (HEAD -> main) Change greeting to Goodbye
3f9a1c2 Add greet script and ignore rules
You want history to stay honest — meaning you don't rewrite the past, you add a correction — so use git revert on the bad commit:
git revert b7e4d91
This creates a new commit that undoes the earlier one. Run git log --oneline and you'll see all three:
c2f8a04 (HEAD -> main) Revert "Change greeting to Goodbye"
b7e4d91 Change greeting to Goodbye
3f9a1c2 Add greet script and ignore rules
Run the script again and the original output returns:
python greet.py
Expected output:
Hello, world!
The history now tells the truth: you made a change, then you undid it. That's often exactly what you want.
Knowledge check
Check your understanding
Answer this question before you continue.
Which command should you reach for?
| Situation | Command | What it does |
|---|---|---|
| Broke a file, haven't committed | git restore <file> | Discards uncommitted edits |
| Last commit is wrong, want an older file | git checkout <id> -- <file> | Copies a file from an older commit |
| Bad change is committed, want history intact | git revert <id> | Adds a new commit that undoes the old one |
A good beginner instinct: start with git restore. It's the least destructive and covers the most common case.
Common Beginner Mistakes and How to Recover
Almost every Git mistake is recoverable — as long as you haven't deleted .git. Here are the ones I see most.
Committing everything blindly with git add . This sweeps in virtual environments, cache folders, and secret files. Fix it with a .gitignore and a careful git status check before every commit. Read what you're about to stage.
Panicking at a scary Git message and deleting .git. This destroys the history you were trying to protect. Git's messages are verbose, not fatal. Read the last line — it usually tells you the exact command to fix things.
Committing too rarely. If one save point contains a week of unrelated changes, restoring becomes guesswork. Commit whenever the script runs correctly.
Writing commit messages that say nothing. "Update" and "fix" make git log useless exactly when you need it most.
Common mistake: Treating a Git error as a dead end. Most errors are recoverable. The one action that isn't is deleting
.git.
Practice: Break It on Purpose, Then Restore It
Reading about restore is not the same as doing it. Run the full loop once and it becomes muscle memory.
- Commit your current working script so you have a known-good save point.
- Deliberately introduce a bug that changes the output — flip a comparison, change a string, whatever's easy.
- Run the script and confirm the wrong output.
- Run
git diffto see exactly what you changed. - Run
git restore <your-file>and run the script again. The original output should return.
Then extend it: make a second commit, use git revert <id> to undo it, and watch the new revert commit appear in git log --oneline.
What to memorize now: status, add, commit, log, diff, restore. These six cover 90% of daily work.
What to look up later: revert, checkout, branching, and remotes. You'll know when you need them.
Where This Leads
The point of version control was never ceremony. It's the freedom to experiment because you can always get back to a working state. That freedom changes how you write code — you try the risky edit, because the cost of being wrong just dropped to one command.
One decision rule to carry forward: commit whenever the script runs correctly, and read the diff before you commit. That's the whole habit.
Your next step is to push this project to a hosted remote so your history survives a dead laptop. That's also the same history you'll point to when you document and present the project to someone else.
Knowledge check
Final check
Finish the article by checking the ideas you just learned.
References
Want a more structured Python path?
Use the Python Starter Pack to turn scattered tutorials into a focused practice path.
Python for Artificial Intelligence Starter Pack
Build a Python foundation you can actually use. The Python for AI Starter Pack brings together a guided path through setup, core programming concepts, data structures, files, JSON, APIs, debugging, and practical projects—so you can move quickly from running your first program to understanding and building useful software.
- 264-page illustrated PDF
- 12 guided Python chapters
- Visual concept diagrams
- Self-assessment quizzes
- Bonus deep-dive sections
- Files, JSON, APIs, debugging & projects
- Foundation for data, automation & AI
Coming soon


